ARMY TM 10-1670-276-23&P
AIR FORCE T.O. 13C5-29-2
NAVY NAVAIR 13-1-29
4836-075
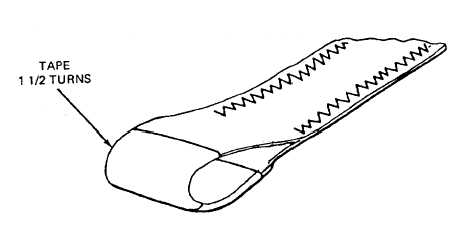
Figure 2-71. Retaping Static Line Clevis Attaching Loop.
b. Replacement. Replace an unserviceable static line by fabricating as follows:
(1)
Remove static line clevis from clevis attaching loop and further remove static line length from attaching loop on
deployment bag. Retain static line clevis for further use, if serviceable.
(2)
Cut a 192 1/2-inch length of 3/4-inch wide tubular nylon webbing and sear ends.
(3)
Place a mark 14 inches from end and make a 7-inch long foldback on one end of the webbing length (figure 2-
72). Beginning at seared edge, secure foldback by stitching two 3/16-inch wide by 4-inch long rows of double-
throw zigzag stitching using size FF nylon thread, 7 to 11 stitches per inch.
(4)
On opposite end of webbing length, mark 11 inches from end and make a 5 1/2-inch long foldback. Secure
foldback using procedure in (3), above
(5)
Using a 2 1/2-inch length of 1-inch wide, type I pressure-sensitive tape, serve the 1 1/2-inch long loop with one
and a halt turns (see figure 2-71).
(6)
Cut a 7 1/2-inch length of 3/4-inch wide tubular nylon webbing and sear ends.
(7)
Place a mark 10 inches from the 3-inch loop end, opposite side of fold back.
(8)
Fold webbing on 4-inch mark, position seared end at 10-inch mark and secure by stitching two 3/16 inch wide by
2 1/2-inch long rows of double-throw zig-zag stitching, using size FF nylon thread, 7-11 stitches per inch.
(9)
Stencil part numbers 11-1-219 on static line webbing using procedures in paragraph 2-19.
(10) If required, reattach the static line to static line attaching loop on deployment bag as outlined in paragraph 2-8.
(11) Install a serviceable riser clevis on 1 1/2-inch long clevis attaching loop according to original riser clevis
installation details.
2-113


