TM 10-1670-280-23&P 0020 00
0020 00-6
e. To complete hole preparation, make a ½-inch foldback of each raw edge. Pin and baste each edge
foldback; use the procedures in the BASTING AND TEMPORARY TACKING paragraph detailed
above.
f.
Using the same type of material as in the original canopy construction, mark and cut a patch 2½-
inches wider and longer than the inside measurements of the prepared hole.
g. Center the patch material over the prepared hole. Ensure the warp or filling of the patch material
matches the warp or filling of the material to be patched. Pin the patch material in position.
h. Make a ½-inch foldunder on each edge of the patch material and baste the patch to the prepared
area. Basting will be performed using the procedures in the BASTING AND TEMPORARY TACKING
paragraph detailed above.
i.
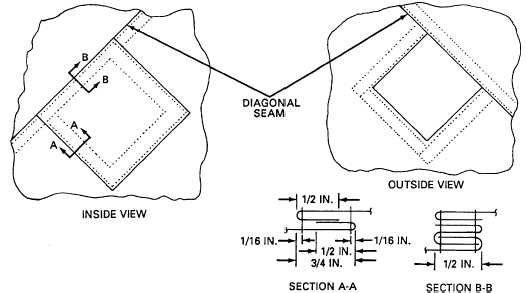
Remove the pushpins securing the canopy to the repair table and secure the patch by stitching
according to the details illustrated below, and using the stitching specifics outlined in tables 1 and 2.
j.
Make the first row of stitching completely around the edges of the patch. Turn the canopy right-side-
out and make a second row of stitching around the edges of the prepared hole. Stitching will be
performed in accordance with the STITCHING AND RESTITCHING paragraph detailed in WP 0014
00.
k. Reposition the canopy items removed or laid aside in step b., in the original location and secure each
item to the canopy by restitching according to original construction details and the STITCHING AND
RESTITCHING paragraph detailed in WP 0014 00.
2. Restenciling. As required, restencil identification markings using procedures in WP 0016 00, MARKING
AND STENCILLING.
Rectangular Patch Including a Diagonal Seam


