ARMY TM 10-1670-281-23&P
AIR FORCE T.O. 13C5-32-2
NAVY NAVAIR 13-1-32
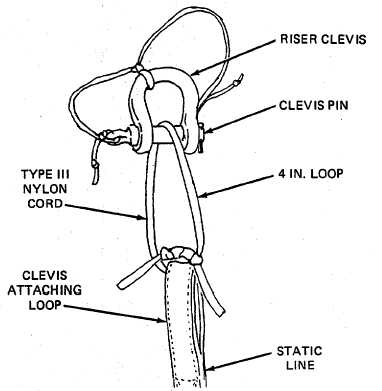
2 Center the cord length around the clevis pin and insure the running cord ends are alined. Pass each
running end of the cord length through the static line clevis attaching loop from opposite
directions(figure 2-100) and secure the cord ends on top of the static line attaching loop with a
surgeon's knot and a locking knot. Make an overhand knot in each running end. Trim each at a point
2 inches from the surgeon’s knot and locking knot.
4839-096
Figure 2-100. Riser Clevis Attached to Breakaway Static Line.
(b) Non-breakaway static line.
1 Remove the cotter pin from the clevis pin and the clevis pin from the body of the clevis.
2 Position the static line clevis attaching loop between the clevis bottom ends and reinsert the clevis pin
into the clevis body, passing the pin through the clevis attaching loop. Reinstall the safety pin into the
end of the clevis pin (figure 2-101).
(8) Stowing the static line. S-fold the static line length in 8-inch folds and secure each end of the folded
webbing with a rubber retainer band (figure 2-102).
(9) Marking the deployment bag. Place a piece of masking tape on deployment bag and mark "breakaway"
or "non-breakaway".
2-103