TM 10-1670-287-23&P
0058 00
0058 00-2
NOTE
When sewing the rib, pull tension on the bottom or top skin as
required; however, let the rib material lay naturally to ensure the rib
and the nose of the canopy fit correctly. Make adjustments as
required using the guide marks made in step 1., above.
8. If the rib being replaced is a loaded rib, start at the tail of the rib, fold and sew a second double row of
stitching using a double needle sewing machine, size E nylon thread and 7 to 11 stitches per inch.
9. Starting at the tail end of the rib, fold and sew the top skin with a double needle sewing machine, size
E nylon thread and 7 to 11 stitches per inch.
10. If the rib being replaced is a loaded rib, start at the tail end of the rib, fold and sew a second row of
stitching using a double needle sewing machine, size E nylon thread and 7 to 11 stitches per inch.
11. Re-sew the tail seam as required, in accordance with original construction and stitch formation.
12. Re-sew any reinforcement tapes as required, in accordance with original construction and stitch
formation.
NOTE
When re-sewing the rib to the bottom skin, ensure that the
reinforcement tapes on the rib are centered on the reinforcement
tape running span wise. Ensure that the guide marks on the rib are
aligned with the guide marks on the bottom skin in the case of the
unloaded rib.
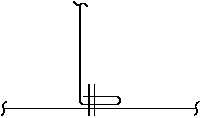
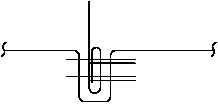
LOADED RIB, BOTTOM SKIN
LOADED RIB, BOTTOM SKIN
NON-LOADED RIB SEAM, BOTTOM SKIN