TM 10-1670-277-23&P 0019 00
0019 00-2
(4)
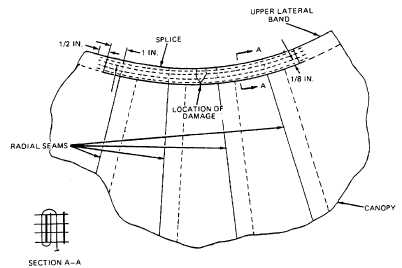
Position webbing on damaged area. Use a heavy-duty sewing machine and size 3 nylon
thread to stitch. Sew webbing in place with four continuous rows of stitching along the full
length of the splice, 5 to 8 stitches per inch. Overstitch ends of webbing by ½-inch.
(5)
Reposition vent lines and sew them in place according to original construction.
b. Damage extending into radial seam. Repair as follows:
(1)
Mark vent line position and cut stitching of vent line attached to damaged radial seam and the
stitching of two vent lines on each side of damaged seam. Move lines to one side.
(2)
Smooth canopy around damaged area.
(3)
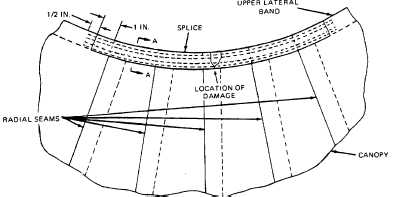
Cut a piece of 1-inch tubular nylon webbing long enough to extend 1-inch beyond outside edge
of second radial seam on each side of damaged area. Wax ends of webbing (WP 0013 00,
SEARING AND WAXING).
(4)
Position tape on damaged area. Use a heavy-duty sewing machine and size 3 nylon thread to
stitch. Sew webbing in place with four continuous rows of stitching along the full length of the
splice, 1/8-inch from edge of tape, 5 to 8 stitches per inch. Overstitch ends of webbing by ½-
inch.
Damage Between Radial Seams
Damage Extending Into Radial Seam