TM 10-1670-287-23&P
0011 00
0011 00-3
c. Fabric tape, webbing, and cordage. Inspect for breaks, burns, cuts, frays, holes, snags, tears,
incorrect weaving, and sharp edges formed from searing; loose, missing, or broken stitching,
tacking, whipping, and weaving; weak spots, wear, and deterioration.
d. Pressure-sensitive (adhesive) tape. Inspect for burns, holes, cuts, tears, weak spots; and
looseness and deterioration.
e. Rubber and elastic. Inspect for burns, cuts, holes, tears, weak spots, loss of elasticity and
deterioration.
3-RING RELEASE/RISER INSPECTION
The following inspection will be conducted to determine the serviceability of the 3-ring release risers
throughout the parachute’s service life. Perform inspection as follows:
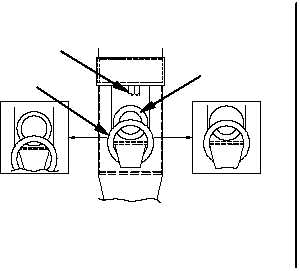
1. Lay the riser to be inspected face up on a smooth flat surface. Flip the smallest metal ring (No. 3) up
toward the top of the riser and then push down on it to firmly seat it in the webbing, securing it to the
riser. The range of allowable relationships between the No. 3 ring and the grommet is illustrated on
the following page.
2. If the riser is serviceable up to this point, flip the No. 3 ring down toward the bottom of the riser. Push
down the No. 2 and No. 3 rings (the next larger ring) to firmly seat them in the webbing, securing
them to the riser. The range of allowable relationships between the No. 3 and No. 2 rings is illustrated
on the following page. The riser to be inspected must now be properly assembled to a harness to
complete the inspection.
CAUTION
Repetitive use of the rings in the same position may cause
elongation. This will prevent the rings from releasing.
3. Rotate the small and large ring and visually check for deformed rings.
Locking Loop
Removed For
Clarity
Grommet
No. 3
Ring
Minimum
Maximum
LOCATION OF NO. 3 RING AND GROMMETS
No. 2
Ring
Maximum
Minimum
LOCATION OF NO. 3 AND NO. 2 RING
No. 3
Ring


