ARMY TM 10-1670-282-23&P
AIR FORCE T.O. 13CS30-2
NAVY NAVAIR 13-1-33
(h)
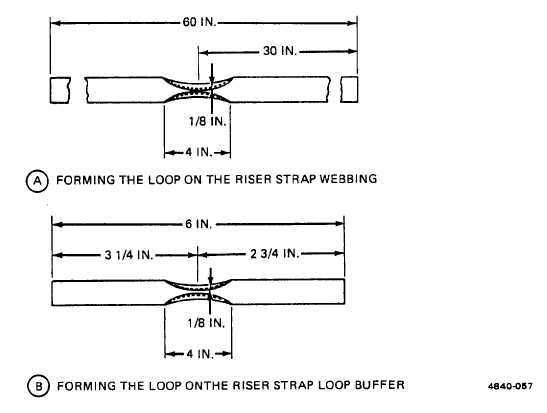
At the center of the 60-inch webbing length, roll 2 inches of the webbing edges in to the center of the
webbing width (A, figure 2-55).
(i)
Secure each rolled edge with a 4-inch long row of stitching according to original construction details.
Stitching will be made in accordance with paragraph 2-17 and using the specifics in table 2-3.
(j)
Using the 6-inch webbing length and the details in (B, figure 2-55), roll 4 inches of the webbing edges in
to the center of the webbing width and secure each rolled edge with a row of stitching. Stitching will be
made In accordance with paragraph 2-17, and using the specifics in table 2-3.
Figure 2-55. Riser Strap Clevis Attaching Loop Construction Details.
(k)
Double the 60-Inch webbing length with the rolled edges facing to the inside of the fold and a line the
running ends.
(/)
Fold the 6-inch webbing length with the rolled edges facing out and allow one end of the folded strap to
overlap by 1/2 inch. The folded webbing will form a buffer for the riser strap clevis attaching loop.
(m) Insert the folded 6-inch webbing length into the loop formed on the folded 60-inch webbing length with
the rolled edges a lined and facing each other.
(n)
Beginning at a point 2 inches back from the webbing fold, secure the plies of the riser strap and the
buffer together by stitching a 1 1/2-inch long single-X-box-stitch formation, with one double end.
Stitching will be made in accordance with paragraph 2-17, and using the specifics in table 2-3.
2-89