TM 10-1670-293-23&P
0012 00
0012 00-11
b. As required, cut the applicable stitching to remove or lay aside items that may interfere with the
patching process.
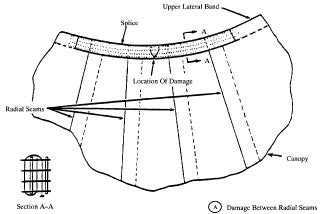
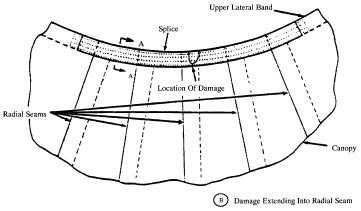
c. Using an authorized marking tool of contrasting color, mark a rectangle or triangle around the
damaged area. Make the mark ½-inch from any adjacent seam, reinforcement, or lateral band.
d. Prepare the damaged area by cutting along the marks made in c., above. Also make a diagonal cut
at each corner of the formed hole to permit a foldback of each raw edge.
e. To complete hole preparation, make a ½-inch foldback of each raw edge. Pin and baste each edge
foldback; use the procedures in the “BASTING AND TEMPORARY TACKING” paragraph, above.
f.
Using the same type of material as in the original canopy construction, mark and cut a patch 2½-
inches wider and longer than the inside measurements of the prepared hole.
g. Center the patch material over the prepared hole. Pin the patch material in position.
h. Make a ½-inch foldunder on each edge of the patch material and baste the patch to the prepared
area. Basting will be performed using the procedures in the BASTING AND TEMPORARY
TACKING paragraph, above.
i.
Remove the pushpins securing the canopy to the repair table and secure the patch by stitching
according to the details in the illustration detailed below, and using the stitching specifics outlined
in Tables 1 and 2, WP 0012 00.