TM 10-1670-327-23&P
0092 00
REPLACE
Replace a damaged suspension line loop as follows:
1. Place canopy in proper layout.
2. Carefully remove the Anti-Inversion Netting (AIN) sewn along the damaged suspension line loop.
Clean the area by removing all loose pieces of thread.
3. Pin the suspension line that is attached to the loop to the adjacent suspension line so that it is out of
the way and continuity is maintained.
4. Carefully remove both the zig-zag and two rows of straight stitching that are holding the damaged
loop to the canopy and the loop closed. This stitching must be removed up to the girth hitched
suspension line. Clean the area by removing all loose pieces of thread.
5. Slide the damaged loop out of the girth hitcheded line while maintaining the girth hitch in the line.
6. Hot cut a 53-inch length of 3/8-inch nylon webbing.
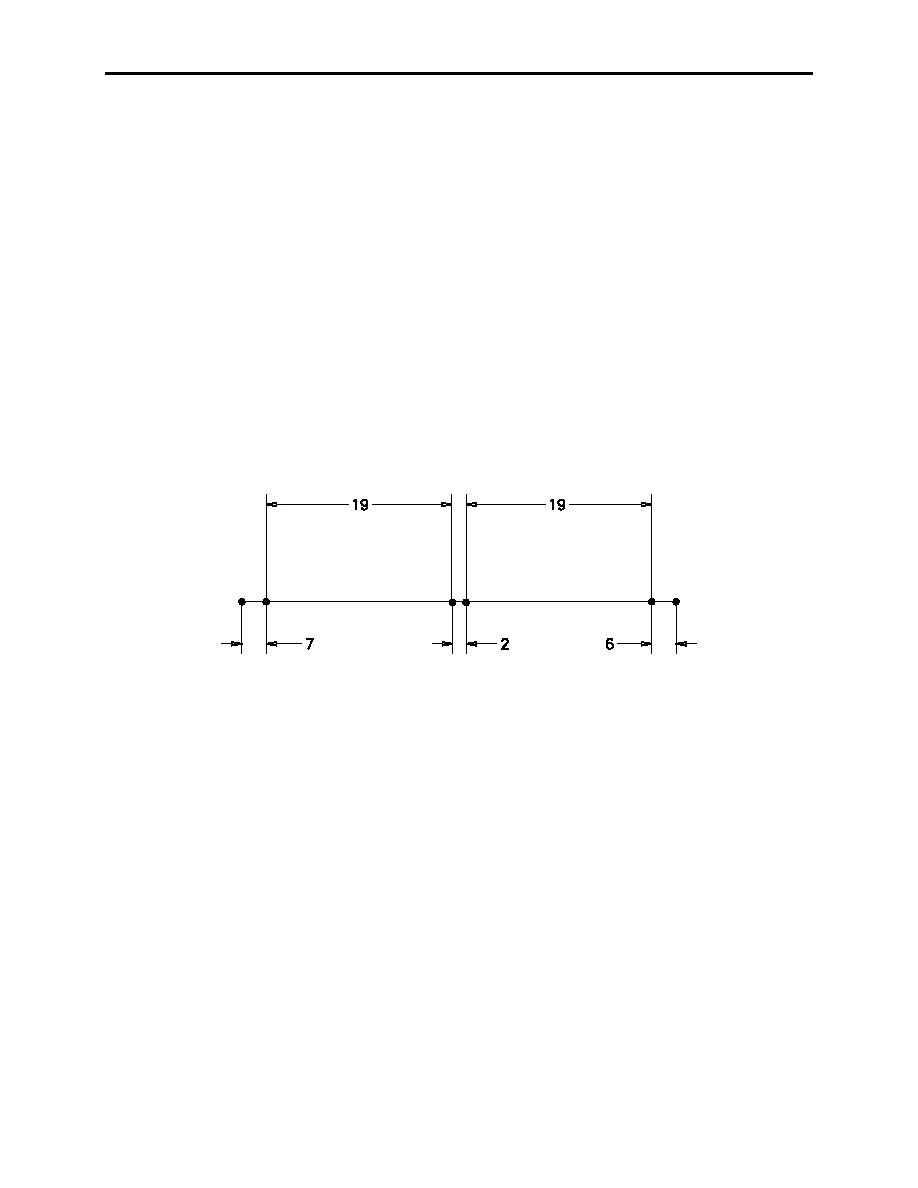
7. Measure and mark webbing IAW figure 3.
Figure 3. Suspension Line Loop Dimensional Information.
8. Take the replacement attachment loop and thread it through the girth hitch in the end of the
suspension line.
9. Fold the new attachment loop approximately in half aligning the two marks for the bottom of the AIN
and the skirt. From the skirt mark, the inside portion of the line loop is 1 inch longer than the outside
(figure 4).
10. Place the new attachment loop so that the canopy skirt and radial are sandwiched between the new
loop and pin in place (figure 4). Ensure that twists have not been introduced in the suspension line.
11. Using a light duty, single needle sewing machine and nylon size E thread, from the outside, begin
sewing 1-inch from the end of the loop sewing toward the skirt of the canopy. Sew up to the skirt
mark.
12. Position the canopy skirt and radial. Ensure that both ends of the suspension line loop are aligned
with the radial.
13. Continue sewing over the skirt band and over the radial to a minimum of 1/2-inch past the inside end
of the suspension line loop (figure 4).
0092 00-3


