TM 10-1670-268-20&P 0014 00
0014 00-2
CLEAN
1. Remove dirt, grease, and foreign material, using plain water or a solution of detergent and water.
2. Rinse with clean water.
3. Wipe dry with clean cloth.
4. Remove burrs by filing.
5. Remove corrosion with a wire brush.
6. If applicable, remove rivet head corrosion with a wire brush.
INSPECT
1. Inspect for wear, cracks, excessive corrosion, bends, deformation and bows.
2. Inspect for punctures or torn areas exceeding 6-inches in diameter.
3. Inspect for damaged or missing tie down rings, floating nuts, or rivets.
REPLACE
1. Replace rear panel assembly (1) if it shows any of the defects identified INSPECTION above.
2. Replace rear panel (1) if interlocking tongue and groove is bent or twisted.
3. Replace rear panel assembly (1) if it is bowed more than 1/16-inch along the 24-inch line or bowed
more than ¼-inch along the 101-inch line.
INSTALL
Install rear panel assembly as follows:
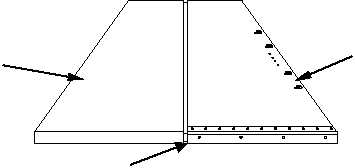
1. Position rear panel assembly (1), tie down rings down, and the leading edge of the panel next to rear
edge of main panel assembly (trailing edge of rear panel assembly is identified by four holes in
center).
2. Install by engaging tongue-and-groove interlock. Rise slightly to engage interlock.
3. Reinstall roller pads and side rails IAW with WP 0012 00 and WP 0013 00.
END OF WORK PACKAGE
Main Panel
Assembly
1
Tongue and Groove Interlock