TM 10-1670-269-23&P
0028 00
0028 00-3
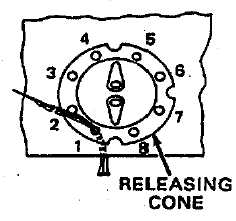
c. Position the replacement pack releasing cone in the original releasing cone location and ensure
the ripcord locking pinhole at the cone top is aligned in the same direction as the original
releasing cone or the other installed cone.
d. Using one turn double, size no. 3 waxed nylon thread, secure the replacement pack releasing
cone by hand-tacking as follows:
(1)
Pass a threaded tacking needle from the inside up through the parachute pack panel and
through the no. 1 hole in the cone base. Allow 3-inches of the tacking thread free end to
remain on the panel inside.
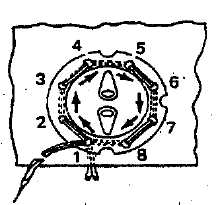
(2)
Working in a counterclockwise direction, pass the needle and thread length down through
hole no. 2 and the parachute pack panel, and back up through the panel hole no. 3.
(3)
Continue tacking around the cone base using the procedure in step (2), above, until the
needle and thread length are passed to the outside at hole no. 1. Remove all slack from
the completed tacking.
(4)
Working in a counterclockwise direction, pass the needle and thread length down through
hole no. 8 and the parachute pack panel, and back up through the panel and hole no. 7.