TM 10-1670-296-20&P 0044 00
0044 00-4
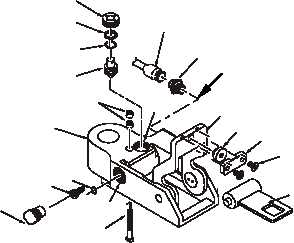
3. Assemble.
a.
Apply a light coating of O-ring lube to new preformed packing (7) and backup ring (6). Install backup
ring, then preformed packing onto piston (5).
1
2
4
5
6
8
9
11
7
19
10
18
12
13
16
14
20
17
15
3
b.
Place piston (5) in top bore (18) and screw in piston stop (4) by hand. Rotate latch (15) closed and
apply pressure on latch to seat piston into bore (18). Using piston stop/shear bolt retainer wrench,
tighten piston stop (4).
c.
Install new shear bolt (9) and retainers (8) into housing (2). Shear bolt should be installed from the
bottom of the EPJD. Retainers should be placed on bolt, notch side up, and installed one at a time.
Make sure each retainer is snug. Use piston stop/shear bolt retainer to facilitate installation of
retainers and shear bolt.
d.
Install latch retainer (16) and keeper (17) onto latch.
e.
Rotate latch (15) onto housing (2) and screw latch retainer (16) onto shear bolt (9).
f.
Apply a light coating of O-ring lube to new preformed packing (12) and install on cross hole plug (11).
g.
Using T-handle hex driver, thread cross hole plug (11) into side bore (19). Do not tighten at this
time.
h.
Torque cross hole plug (11) to 72-inch pounds.
i.
Install retainer clamp (14) in place over latch retainer (16), and secure with two screws (13).
j.
Test squib in accordance with the TEST procedures detailed in this WP.
WARNING
Squib must be installed with squib cable and safety cap installed. DO
NOT SEPARATE SQUIB CABLE WITH SAFETY CAP FROM SQUIB.
Failure to follow precautions can result in injury to personnel.


