ARMY TM 10-1670-281-23&P
AIR FORCE T.O. 13C5-32-2
NAVY NAVAIR 13-1-32
2-26. Canopy Line (cont).
(d) Position the unwaxed end of the cord length on the applicable connector link assembly in the
original suspension line location. Using a suitable marking aid, mark the line on the inside,
edge of the link assembly. Secure the cord end to the connector link with two half-hitches,
leaving a 6-inch long tie free end.
(e) Remove the upper, intermediate and lower radial seam reinforcement tapes from the
applicable radial seam by cutting the stitching securing the tape lengths to the canopy. Also
cut the stitching securing the V-tab and suspension line together.
(f) At a suitable point below the canopy skirt, cut the original suspension line.
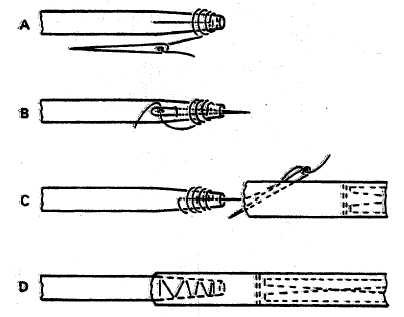
(g) Insert 1 inch of the waxed end of the replacement suspension line into the sheath cover at
the cut end of the original suspension line. Secure the two lines together with whip stitching
(figure 2-115).
4839-114
Figure 2-115. Securing Damaged Line to New Line for Line Replacement.
(h) Working at the canopy vent and using a suitable marking aid, mark the original radial line at
the upper edge of the upper lateral band.
(i) Pull 10 inches of the original radial line from the upper end of the radial seam and cut the line
length at a point 6 inches below the mark made in (h), above.
(j) Pull the original radial line up through the radial seam until the attached replacement line
length extends beyond the upper edge of the upper lateral band. Pull all slack out of the
replacement line.
(k) Remove one end of the applicable pocket band by cutting the stitching securing the pocket
band end to the lower lateral band. Position the loose pocket band end above the secured
end and temporarily secure the loose end to the lateral band using a pushpin.
2-138


