ARMY TM 10-1670-281-23&P
AIR FORCE T.O. 13C5-32-2
NAVY NAVAIR 13-1-32
(m) Place the webbing length lengthwise over the original radial seam upper end on the canopy
inside and aline the webbing upper end with the upper edge of the upper lateral band.
Secure the webbing length in position using temporary tacking or pushpins.
(n) Place the loose end of the original vent line on the radial seam outside, adjacent to the
replacement radial line. Aline the mark made in (h), above, with the upper edge of the upper
lateral band. Secure the vent line loose end and the upper end of the replacement radial line
to the radial seam using temporary tacking or pushpins.
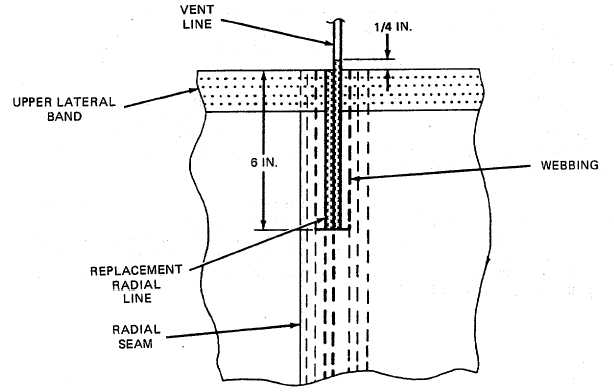
(o) Working on the outside of the canopy top, secure the 6-inch long webbing seam by making a
row of 3/16-inch wide double-throw zigzag stitching from 1/4 inch above the upper lateral
band to the end of the vent line. Stitching will be made using size E nylon thread, 7 to 11
stitches per inch, with a medium-duty sewing machine.
(p) Beginning at a point 6 inches below the upper lateral band upper edge, secure the 6-inch
long webbing and the upper end of the replacement radial line by stitching a 6-inch-long row
of 3/16-inch wide double-throw zigzag stitching to the upper edge of the upper lateral band.
Stitching will be made using a medium-duty sewing machine and size E nylon thread, 7 to 11
stitches per inch (figure 2-116). Remove temporary tacking or pushpins installed in (m) and
(n), above.
{q) Working at the lower lateral band nick up the loose end of the replacement radial line and an
adjacent radial line and allow both lines to settle under equal tension.
Figure 2-116. Securing Radial Line and Vent Line to Canopy.
2-141


