ARMY TM 10-1670-281-23&P
AIR FORCE T.O. 13C5-32-2
NAVY NAVAIR 13-1-32
4839-152
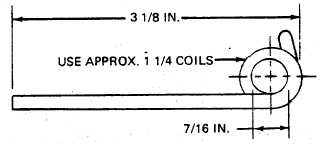
Figure 2-151. Forming Riser Clevis Safety Pin.
(4) Bridle line.
(a) Restitching. Stitch and restitch broken or loose stitching using a zig-zag sewing machine with
size E nylon thread which matches the color of the original stitching, when possible. Restitch
by overstitching each end of the stitch formation by 1/2 inch. Restitch directly over the
original stitching, following the original stitch pattern as closely as possible.
(b) Replacement. Replace an unserviceable bridle line by fabricating as follows:
1 Remove the bridle line from the inner loop within the static line pilot parachute bag by untieing
the knot securing the line to the loop.
2 Cut a 22-inch length of type IV coreless nylon cord and taper-cut 1/2 inch of each end.
3 Using a suitable marking aid, mark the cord length at points 2 1/2, 5 1/2, and 8 1/2 inches from
one end, and 2 1/2 and 10 1/2 inches from the opposite end.
4 Insert a suitable splicing aid into the cord casing at the 8 1/2-inch mark and work the splicing
aid through the cord casing to the outside at the 5 1/2-inch mark.
5 Attach the nearest tapered cord end to the splicing aid and pull the aid back through the cord
casing until the 2 1/2- and 5 1/2-inch marks are alined and a 1 1/2-inch long loop is formed
(figure 2-152).
6 Hold the alined marks together and continue pulling the splicing aid back through the cord
casing to the outside at the 8 1/2-inch mark, allowing only the cord tapered end to protrude
from the cord casing.
7 Remove the cord tapered end from the splicing aid. While holding the alined marks, stretch
the cord length to permit the tapered end to recede into the cord casing.
8 Reinsert the splicing aid into the cord casing at the 8 1/2-inch mark and work the splicing aid
through the cord casing to the outside at the 10 1/2-inch mark.
2-211


