ARMY TM 10-1670-275-23&P
AIR FORCE TO 13C5-25-2
NAVY NAVAIR 13-1-26
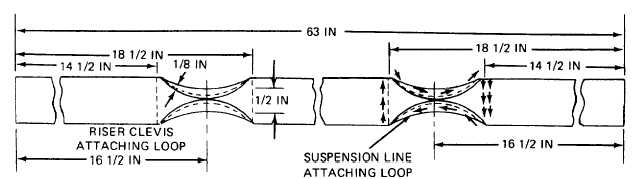
2-31. Riser (cont).
(3) Using a suitable marking aid, mark each webbing length at 14 1/2 inches, 16 1/2 inches and 18 1/2
inches from each end (figure 2-64).
(4) Using a light duty sewing machine and size 3 nylon thread, stitch webbing 5 to 8 stitches per inch as
follows:
(a) Start at edge of webbing at a 14 1/2-inch mark, and stitch across width of webbing. Stitch to
a point 1/8 inch from edge of webbing width.
(b) Between 14 1/2-inch and 18 1/2-inch mark, roll edge of webbing to center. Secure rolled
edge of webbing by stitching 1/8 inch from edge (figure 2-64).
(c) Stitch across width of webbing. Stitch to a point 1/8 inch from edge of webbing width.
(d) Between 18 1/2-inch and 14 1/2-lnch mark, roll edge of webbing to center. Secure rolled
edge of webbing by stitching 1/8 inch from edge. Stitch across width of webbing.
(e) Insure this row of stitching Is directly over first row of stitching.
(f) Repeat this procedure at each remaining sets of marks on opposite end of webbing lengths.
4706-068
Figure 2-64. Riser Fabrication Details.
(5) Select a rolled portion on each webbing length which will form suspension line attaching loops. Tape
center 2-1/2 inches of these rolled portions using five turns single of 1-inch wide tape, cut or split to
1/2-inch width (figure 2-65).
2-92