TM 10-1670-201-23
T.O. 13C-1-41
NAVAIR 13-1-17
inch marks, stretch the original line to allow the
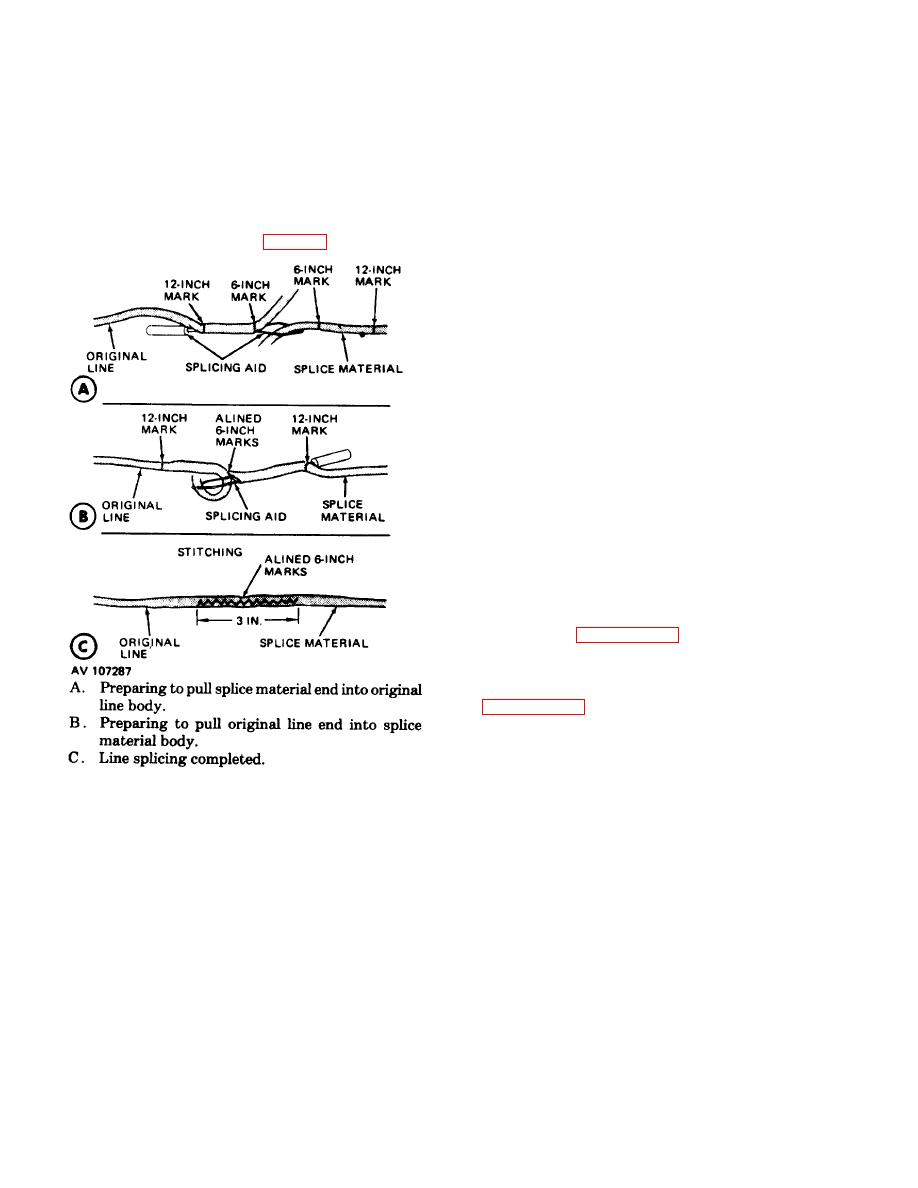
(6) Insert a splicing aid into the body of the
protruding splice material end to recede into the line
original line length at one 12-inch mark. Work the
body.
splicing aid through the cord body and to the outside at
the 6-inch mark.
(11) Insert the splicing aid into the splice
material body at the 12-inch mark nearest the alined 6-
(7) Thread and secure one end of the splice
inch marks. Work the splicing aid through the body of
material to the splicing aid. (A, fig. 3-11).
the splice material and to the outside at the alined 6-
inch marks.
(12) Attach the adjacent tapered line end to
the splicing aid (B) and pull the splicing aid back into the
splice material body.
(13) Pull the splicing aid back through the
splice material until the attached line end protrudes from
the 12-inch mark, the point of splicing aid insertion.
Remove the attached line end from the splicing aid.
(14) Grasp the splice material free end and the
original line, and stretch the material to allow the
protruding line end to recede into the body of the splice
material.
(15) Using the procedures in (6) through (14)
above, splice the free end of the splice material to the
remaining cut end of the original line.
(16) Secure each end of the line splice by
stitching a 3-inch-long row of double-throw zig-zag
stitching across each set of alined 6-inch marks (C).
Stitching will be made using the specifics in the
applicable item equipment publication and the
procedures in paragraph 3-9.
(17) As applicable, reinstall the skirt hesitator
tab using' the procedures and specifics in the applicable
item equipment publication and the procedures in
3-17. Splicing Lateral Bands.
The splicing of damaged and/or severed upper and
lower lateral bands is permitted on all parachute
Figure 3-11. Making a line splice with coreless
canopies. When a damaged lateral band is originally
fibrous cord, typical.
constructed with only one ply of webbing, a splice will be
applied on the inside of the canopy. If a damaged
(8) Pull the threaded splicing aid back into
lateral band is originally made of two plies of webbing,
the line and back through the line body until the 6-inch
then the splice may be made on either the inside or the
mark on the attached end of the splice material is alined
outside of the canopy, depending on the location of the
with the 6-inch mark on the original line end being
damage. In the event both plies of webbing on a two-ply
spliced.
lateral band are damaged, a splice will be applied to
(9) Hold the original line and the splice
both sides of the canopy. The following paragraphs
material at the alined 6-inch marks and continue pulling
provide procedures on the splicing of an upper lateral
the splicing aid until the attached splice material end
band and a lower lateral band.
protrudes from the line body at the 12-inch mark, the
a. Upper Lateral Band. A parachute canopy upper
point of original splicing aid insertion. Remove the
lateral band may be spliced one time as follows:
attached splice material end from the splicing aid.
(1) Place the applicable canopy on a repair
(10) While holding the splice at the alined 6-
Change 3 3-26


